CodeceptJS + PuppeteerでWebアプリの動作テストを自動化した
最近定期的にWebアプリの動作テストをする必要がでてきました。
「毎回手動でテストをするのも面倒だな」と感じていたところ、Qiitaで下記の記事を見かけました。
mechanizeやSeleniumやheadless chromeでテストツールを作ったことはあったのですが、せっかくなので使ったことのないCodeceptJSとPuppeteerを使ってテストを自動化してみました。
目次
- CodeceptJSとは?
- 環境
- インストール
- プロジェクトの雛形を作成
- テスト用Webアプリ作成
- Puppeteerに実行させる処理を記載する
- テスト状況を画面に表示させる
- テストレポートを保存する
- サンプルコード
- まとめ、最後に
- 追記
CodeceptJSとは?
アプリをテストするためのフレームワークです。
Puppeteer、Protractor、Nightmareを使ってWebアプリをテストするだけでなく、Appiumというエミュレータを使うことでモバイルアプリのテストも自動化できるそうです。
今回CodeceptJSを使うにあたってPuppeteerのサンプルコードを見てみましたが、CodeceptJSでは、Puppeteerのコードよりもシンプルに処理を記載できる印象でした。
環境
Ubuntu 16.04
インストール
CodeceptJSとPuppeteerをインストールします。
$ npm install codeceptjs puppeteer
プロジェクトの雛形を作成
プロジェクトの雛形を作成します。
$ ./node_modules/codeceptjs/bin/codecept.js init

  Welcome to CodeceptJS initialization tool
  It will prepare and configure a test environment for you

? Where are your tests located? ./*_test.js
? What helpers do you want to use? Puppeteer
? Where should logs, screenshots, and reports to be stored? ./output
? Would you like to extend I object with custom steps? Yes
? Do you want to choose localization for tests? English (no localization)
? Where would you like to place custom steps? ./steps_file.js
Configure helpers...
? [Puppeteer] Base url of site to be tested http://localhost:8000/
Directory for temporary output files is already created at './output'
Almost done! Create your first test by executing `codeceptjs gt` (generate test) command
「Would you like to extend I object with custom steps?」をYesにすると、「Where would you like to place custom steps?」聞かれ、custom stepsを記載する「steps_file.js」が生成されます。
「steps_file.js」では、ログイン処理など、ブラウザで処理を実行する際の事前準備のような設定を記載できるらしいです。
続いて、実際の処理を記載するファイルの雛形を作成します。
$ ./node_modules/.bin/codeceptjs gt
Creating a new test...
----------------------
? Filename of a test puppeteer-sample
? Feature which is being tested Puppeteer Sample
雛形が作成されました。
$ cat puppeteer-sample_test.js

Feature('Puppeteer Sample');

Scenario('test something', (I) => {

});
この時点ではこのようなファイルが作成されています。
$ ls
codecept.conf.js  node_modules  output  package-lock.json  puppeteer-sample_test.js  steps_file.js
テスト用Webアプリ作成
Puppeteerの動作をテストするための簡単なフォームを準備します。
とてもシンプルなハリボテのフォームです。
index.html
<html>
    <head>
        <title>Puppeteer Sample</title>
    </head>
    <body>
        <p>Puppeteer Sample</p>
        <form action="/index2.html" method="POST">
            <p>input 1</p>
            <input type="text" id="id1" value="">
            <p>input 2, 3</p>
            <input type="radio" id="id2" value="input2">input2
            <input type="radio" id="id3" value="input3">input3
            <p>select</p>
            <select>
                <option valut="select1">select1</option>
                <option valut="select2">select2</option>
                <option valut="select3">select3</option>
            </select>
            <br>
            <br>
            <input type="submit" value="submit">
        </form>
    </body>
</html>
index2.html
<html>
    <head>
        <title>Puppeteer Sample</title>
    </head>
    <body>
        <p>Your message has been sent.</p>
    </body>
</html>
Webアプリの動作確認
今回はPHPに含まれているビルドインウェブサーバを利用します。
$ php -S localhost:8000
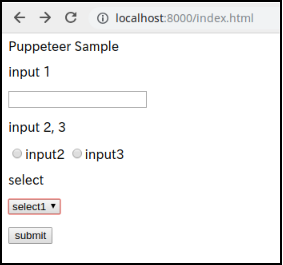
ブラウザから見るとこのようになります。

Puppeteerに実行させる処理を記載する
puppeteer-sample_test.jsにPuppeteerで自動化したい処理を書いていきます。
今回は先程作成したフォームに色々と入力し、「submit」ボタンをクリックさせます。
そして、遷移後の画面に「Your message has been sent.」という文字があるか確認しています。
puppeteer-sample_test.jsを下記のように編集します。
Feature('Puppeteer Sample');

Scenario('test something', (I) => {
    I.amOnPage('/');
    I.fillField({xpath: '//*[@id="id1"]'}, 'test');
    I.click({xpath: '//*[@id="id2"]'});
    I.selectOption({xpath: '/html/body/form/select'}, 'select3');
    I.click({xpath: '/html/body/form/input[4]'});
    I.see('Your message has been sent.');

});
クリックするボタンやテキストフィールドはxpathで指定することができます。
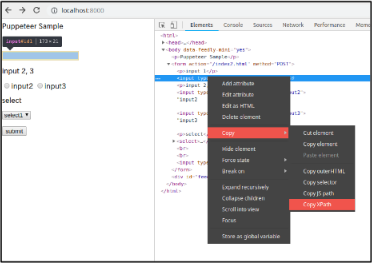
xpathを指定する場合は、chromeのデベロッパーツールを使うと便利です。
Chromeの機能でxpathを取得する方法
- chromeでデベロッパーツールを開く
- 「select an element in the page to inspect it」をクリック

- xpathを取得したいテキストフォームなどをクリック
- Elementsに表示された、目的のinputタグなどを右クリック
- Copy-->Copy XPath
テスト状況を画面に表示させる
このままでもテストを実行できるのですが、テスト実施のログが表示されるのみで、画面は表示されません。
実行時の表示
$ ./node_modules/codeceptjs/bin/codecept.js run puppeteer-sample_test.js --steps
CodeceptJS v2.0.7

Puppeteer Sample --
  test something
    I am on page "/"
    I fill field {"xpath":"//*[@id=\"id1\"]"}, "test"
    I click {"xpath":"//*[@id=\"id2\"]"}
    I select option {"xpath":"/html/body/form/select"}, "select3"
    I click {"xpath":"/html/body/form/input[4]"}
    I see "Your message has been sent."
  ✔ OK in 746ms


  OK  | 1 passed   // 977ms
画面を表示させるには、codecept.conf.jsに設定を追記する必要があります。
「codecept.conf.js」に「show: true,」を追記します。
exports.config = {
  tests: './*_test.js',
  output: './output',
  helpers: {
    Puppeteer: {
      url: 'http://localhost:8000/',
      show: true, // <--追記
    }
  },
  include: {
    I: './steps_file.js'
  },
  bootstrap: null,
  mocha: {},
  name: 'puppeteer-sample'
}
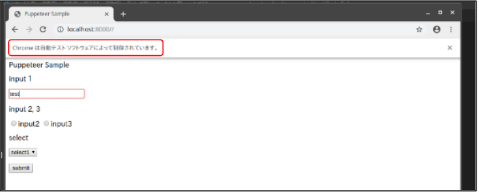
もう一度実行すると、ブラウザが立ち上がり、puppeteer-sample_test.jsに記載した処理が実行されます。
自動で実行されるので、「Chromeは自動テストソフトウェアによって制御されています」と表示されます。
テストレポートを保存する
実行したテストの記録を画像で保存することもできます。
codecept.config.jsに設定を追記します。
codecept.config.js
exports.config = {
  tests: './*_test.js',
  output: './output',
  helpers: {
    Puppeteer: {
      url: 'http://localhost:8000/',
      show: true,
    }
  },
  // 追記ここから
  plugins: {
    stepByStepReport: {
      enabled: true,
      deleteSuccessful: false,
    },
  },
  // 追記ここまで
  include: {
    I: './steps_file.js'
  },
  bootstrap: null,
  mocha: {},
  name: 'puppeteer-sample'
}
テストを実行します。
$ ./node_modules/codeceptjs/bin/codecept.js run --steps
テストが完了すると、./output以下にrecords.htmlというファイルが作成されます。
$ ls ./output/
record_test_something_1552195404  records.html
各テストの実行内容と、実行結果の画像が記録されています。
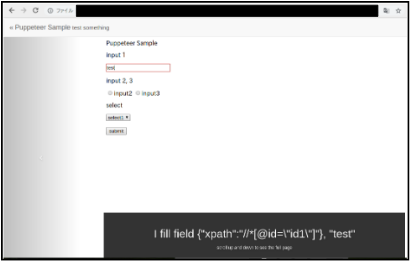
サンプルコード
上記のコードは、こちらにおいています。
まとめ、最後に
CodeceptJSを使うことで、とても簡単にWebアプリのテストを行うことができました。
「ページにアクセスする」「テキストフィールドに入力する」「クリックする」「画面表示を確認する」といった内容を直感的に記載でき、テスト結果もわかりやすくレポートしてくれます。
サクサクとテストを自動化することができますね。
今回はかなりシンプルなフォームでしか利用していませんが、もう少し複雑なテストを自動化したくなった場合には、CodeceptJSではなくPuppeteerを直接触る必要があるのかもしれません。
追記
SSLエラーを無視する設定
テスト時にSSLエラーが発生すると、テストが止まってしまいます。
SSLエラーを無視する方法については、こちらをご参照ください。
Chromeのウインドウサイズを変更する設定
デフォルト状態では、自動起動するChromeの画面サイズが非常に小さいです。
Chromeの画面サイズを設定する方法については、こちらをご参照ください。