Flutter入門。サンプルアプリ作成とアプリデータの調査
前回、Flutterの開発環境を構築しました。
今回はTest driveのサンプルアプリを動作させて、ビルドされたapkファイルを調査してみました。
目次
android端末との接続確認
$ flutter devices
  ╔════════════════════════════════════════════════════════════════════════════╗
  ║ A new version of Flutter is available!                                     ║
  ║                                                                            ║
  ║ To update to the latest version, run "flutter upgrade".                    ║
  ╚════════════════════════════════════════════════════════════════════════════╝


1 connected device:
XXXXX
updateがあるとのことなので、最新バージョンに更新しておきます。
$ flutter upgrade
Your flutter checkout has local changes that would be erased by upgrading. If you want to keep these changes, it is recommended
that you stash them via "git stash" or else commit the changes to a local branch. If it is okay to remove local changes, then
re-run this command with --force.
$ cd flutter/
$ git pull
Test driveアプリ作成
サンプルアプリのプロジェクトを作成
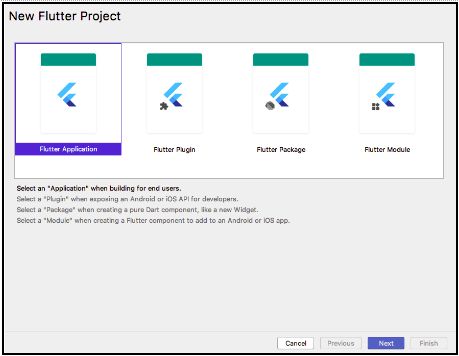
Android Studioを起動し、「Start a new Flutter project」


必要な項目を入力してfinish

プロジェクトが作成されました。
はじめまして、dart。

AndroidManifest.xmlはJavaやKotlinのプロジェクトと大きく変わらない様子です。

build and run

初回実行時は各種インストールと依存の解決をしているらしく、結構時間がかかりました。

無事にサンプルアプリがインストールされました。

ホットリロードを試す
Flutterの特徴の1つであるホットリロードを試します。
Test driveの記事に従って、lib/main.dartを編集します。
変更前

変更後

保存すると同期を開始します。
色々updateが走っているからか、初回のhot reloadは結構時間がかかりました。
Androidのemulatorの更新もしていたので、だいぶ待ちました。
各種プラグインのupdateが終わったらIDEを再起動。
再度ソースを変更すると、ホットリロードが無事に機能しました。
ホットリロードはとても早くていいですね。
ホットリロードはリソースを使うので、アニメーションがなめらかに動かないことがあるようです。
apkファイルの調査
この時点で作成されたapkファイルを少し調べてみます。
AndroidManifest.xml
ビルド後のapkファイルから取得したXML
<?xml version="1.0" encoding="utf-8" standalone="no"?><manifest xmlns:android="http://schemas.android.com/apk/res/android" android:compileSdkVersion="28" android:compileSdkVersionCodename="9" package="com.example.flutter_sample_app" platformBuildVersionCode="1" platformBuildVersionName="1.0.0">
    <uses-permission android:name="android.permission.INTERNET"/>
    <application android:debuggable="true" android:icon="@mipmap/ic_launcher" android:label="flutter_sample_app" android:name="io.flutter.app.FlutterApplication">
        <activity android:configChanges="density|fontScale|keyboard|keyboardHidden|layoutDirection|locale|orientation|screenLayout|screenSize|uiMode" android:hardwareAccelerated="true" android:launchMode="singleTop" android:name="com.example.flutter_sample_app.MainActivity" android:theme="@style/LaunchTheme" android:windowSoftInputMode="adjustResize">
            <meta-data android:name="io.flutter.app.android.SplashScreenUntilFirstFrame" android:value="true"/>
            <intent-filter>
                <action android:name="android.intent.action.MAIN"/>
                <category android:name="android.intent.category.LAUNCHER"/>
            </intent-filter>
        </activity>
    </application>
</manifest>
Android Studioで表示したXML
<manifest xmlns:android="http://schemas.android.com/apk/res/android"
    package="com.example.flutter_sample_app">

    <!-- io.flutter.app.FlutterApplication is an android.app.Application that
         calls FlutterMain.startInitialization(this); in its onCreate method.
         In most cases you can leave this as-is, but you if you want to provide
         additional functionality it is fine to subclass or reimplement
         FlutterApplication and put your custom class here. -->
    <application
        android:name="io.flutter.app.FlutterApplication"
        android:label="flutter_sample_app"
        android:icon="@mipmap/ic_launcher">
        <activity
            android:name=".MainActivity"
            android:launchMode="singleTop"
            android:theme="@style/LaunchTheme"
            android:configChanges="orientation|keyboardHidden|keyboard|screenSize|locale|layoutDirection|fontScale|screenLayout|density|uiMode"
            android:hardwareAccelerated="true"
            android:windowSoftInputMode="adjustResize">
            <!-- This keeps the window background of the activity showing
                 until Flutter renders its first frame. It can be removed if
                 there is no splash screen (such as the default splash screen
                 defined in @style/LaunchTheme). -->
            <meta-data
                android:name="io.flutter.app.android.SplashScreenUntilFirstFrame"
                android:value="true" />
            <intent-filter>
                <action android:name="android.intent.action.MAIN"/>
                <category android:name="android.intent.category.LAUNCHER"/>
            </intent-filter>
        </activity>
    </application>
</manifest>
見比べてみると、apkから取得したAndroidManifest.xmlでは
<uses-permission android:name="android.permission.INTERNET"/>
が追加されていますね。デバッグ用ビルドだからでしょうか。
application android:debuggable="true"
も追加されていますね。
デコンパイルしたjarファイル
MainActivity.classをみると、
import io.flutter.app.FlutterActivity;
import io.flutter.plugins.GeneratedPluginRegistrant;

public class MainActivity
  extends FlutterActivity
{
}
となっていて、io.flutter.app.FlutterActivity.classでonCreate()などのイベント時に呼ばれる関数が定義されていました。

次回
次は下記のサンプルを動かして、今回と同様にビルド後のデータと差分を見てみようと思います。